Explodeysquirrel (talk | contribs) mNo edit summary Tag: Visual edit |
Explodeysquirrel (talk | contribs) (Updated climate table (in-progress)) Tag: Visual edit |
||
| Line 70: | Line 70: | ||
! style="padding: 8px"|[[Tropical]] |
! style="padding: 8px"|[[Tropical]] |
||
|- |
|- |
||
| ⚫ | |||
| − | | |
||
![[Rabbit]] |
![[Rabbit]] |
||
| − | ! rowspan="3" |Meat |
+ | ! rowspan="3" |Meat Source |
! |
! |
||
![[File:Green_check.svg|link=https://ymir.gamepedia.com/File:Green_check.svg|center|frameless|75x75px]] |
![[File:Green_check.svg|link=https://ymir.gamepedia.com/File:Green_check.svg|center|frameless|75x75px]] |
||
| Line 82: | Line 82: | ||
! |
! |
||
|- |
|- |
||
| − | |[[File: |
+ | |[[File:Plant_sugarcane_3_crop.png|link=https://ymir.gamepedia.com/File:Plant_sugarcane_3_crop.png|center|frameless|64x64px]] |
![[Chicken]] |
![[Chicken]] |
||
! style="padding: 8px" | |
! style="padding: 8px" | |
||
| Line 93: | Line 93: | ||
! style="padding: 8px" |[[File:Green_check.svg|link=https://ymir.gamepedia.com/File:Green_check.svg|center|frameless|75x75px]] |
! style="padding: 8px" |[[File:Green_check.svg|link=https://ymir.gamepedia.com/File:Green_check.svg|center|frameless|75x75px]] |
||
|- |
|- |
||
| − | |[[File: |
+ | |[[File:Plant_sugarcane_3_crop.png|link=https://ymir.gamepedia.com/File:Plant_sugarcane_3_crop.png|center|frameless|64x64px]] |
![[Ostrich]] |
![[Ostrich]] |
||
! style="padding: 8px" | |
! style="padding: 8px" | |
||
| Line 104: | Line 104: | ||
! style="padding: 8px" | |
! style="padding: 8px" | |
||
|- |
|- |
||
| − | |[[File: |
+ | |[[File:Plant_sugarcane_3_crop.png|link=https://ymir.gamepedia.com/File:Plant_sugarcane_3_crop.png|center|frameless|64x64px]] |
![[Deer]] |
![[Deer]] |
||
| − | !Leather |
+ | ! rowspan="5" |Leather Source |
| − | + |
+ | + |
| + | |||
| + | Meat Source |
||
! |
! |
||
![[File:Green_check.svg|link=https://ymir.gamepedia.com/File:Green_check.svg|center|frameless|75x75px]] |
![[File:Green_check.svg|link=https://ymir.gamepedia.com/File:Green_check.svg|center|frameless|75x75px]] |
||
| Line 117: | Line 119: | ||
! |
! |
||
|- |
|- |
||
| − | |[[File: |
+ | |[[File:Plant_sugarcane_3_crop.png|link=https://ymir.gamepedia.com/File:Plant_sugarcane_3_crop.png|center|frameless|64x64px]] |
![[Cow]] |
![[Cow]] |
||
| − | !Leather |
||
| − | + Meat |
||
! |
! |
||
![[File:Green_check.svg|link=https://ymir.gamepedia.com/File:Green_check.svg|center|frameless|75x75px]] |
![[File:Green_check.svg|link=https://ymir.gamepedia.com/File:Green_check.svg|center|frameless|75x75px]] |
||
| Line 130: | Line 130: | ||
! |
! |
||
|- |
|- |
||
| − | |[[File: |
+ | |[[File:Plant_sugarcane_3_crop.png|link=https://ymir.gamepedia.com/File:Plant_sugarcane_3_crop.png|center|frameless|64x64px]] |
![[Goat]] |
![[Goat]] |
||
| ⚫ | |||
| − | + Meat |
||
! style="padding: 8px" | |
! style="padding: 8px" | |
||
! style="padding: 8px" | |
! style="padding: 8px" | |
||
| Line 143: | Line 141: | ||
! style="padding: 8px" | |
! style="padding: 8px" | |
||
|- |
|- |
||
| − | |[[File: |
+ | |[[File:Plant_sugarcane_3_crop.png|link=https://ymir.gamepedia.com/File:Plant_sugarcane_3_crop.png|center|frameless|64x64px]] |
| − | ![[ |
+ | ![[Buffalo]] |
| − | !Leather |
||
| − | + Meat |
||
| ⚫ | |||
| − | ! style="padding: 8px" | |
||
! style="padding: 8px" | |
! style="padding: 8px" | |
||
! style="padding: 8px" | |
! style="padding: 8px" | |
||
| Line 154: | Line 148: | ||
! style="padding: 8px" | |
! style="padding: 8px" | |
||
! style="padding: 8px" | |
! style="padding: 8px" | |
||
| + | ! style="padding: 8px" |[[File:Green_check.svg|link=https://ymir.gamepedia.com/File:Green_check.svg|center|frameless|75x75px]] |
||
| ⚫ | |||
! style="padding: 8px" |[[File:Green_check.svg|link=https://ymir.gamepedia.com/File:Green_check.svg|center|frameless|75x75px]] |
! style="padding: 8px" |[[File:Green_check.svg|link=https://ymir.gamepedia.com/File:Green_check.svg|center|frameless|75x75px]] |
||
|- |
|- |
||
| − | |[[File: |
+ | |[[File:Plant_sugarcane_3_crop.png|link=https://ymir.gamepedia.com/File:Plant_sugarcane_3_crop.png|center|frameless|64x64px]] |
| − | ![[ |
+ | ![[Capybaras|Capybara]] |
| − | ! style="padding: 8px" | |
+ | ! style="padding: 8px" | |
| ⚫ | |||
| − | + Meat |
||
! style="padding: 8px" | |
! style="padding: 8px" | |
||
! style="padding: 8px" | |
! style="padding: 8px" | |
||
| Line 165: | Line 161: | ||
! style="padding: 8px" | |
! style="padding: 8px" | |
||
! style="padding: 8px" | |
! style="padding: 8px" | |
||
| ⚫ | |||
| − | ! style="padding: 8px" | |
||
! style="padding: 8px" |[[File:Green_check.svg|link=https://ymir.gamepedia.com/File:Green_check.svg|center|frameless|75x75px]] |
! style="padding: 8px" |[[File:Green_check.svg|link=https://ymir.gamepedia.com/File:Green_check.svg|center|frameless|75x75px]] |
||
|- |
|- |
||
| − | |[[File: |
+ | |[[File:Plant_sugarcane_3_crop.png|link=https://ymir.gamepedia.com/File:Plant_sugarcane_3_crop.png|center|frameless|64x64px]] |
![[Sheep]] |
![[Sheep]] |
||
! rowspan="2" |Textiles |
! rowspan="2" |Textiles |
||
| Line 181: | Line 175: | ||
! |
! |
||
|- |
|- |
||
| − | |[[File: |
+ | |[[File:Plant_sugarcane_3_crop.png|link=https://ymir.gamepedia.com/File:Plant_sugarcane_3_crop.png|center|frameless|64x64px]] |
![[Llama]] |
![[Llama]] |
||
! |
! |
||
| Line 192: | Line 186: | ||
![[File:Green_check.svg|link=https://ymir.gamepedia.com/File:Green_check.svg|center|frameless|75x75px]] |
![[File:Green_check.svg|link=https://ymir.gamepedia.com/File:Green_check.svg|center|frameless|75x75px]] |
||
|- |
|- |
||
| − | |[[File: |
+ | |[[File:Plant_sugarcane_3_crop.png|link=https://ymir.gamepedia.com/File:Plant_sugarcane_3_crop.png|center|frameless|64x64px]] |
![[Mammoth]] |
![[Mammoth]] |
||
! rowspan="4" |Mounted |
! rowspan="4" |Mounted |
||
| Line 205: | Line 199: | ||
! |
! |
||
|- |
|- |
||
| − | |[[File: |
+ | |[[File:Plant_sugarcane_3_crop.png|link=https://ymir.gamepedia.com/File:Plant_sugarcane_3_crop.png|center|frameless|64x64px]] |
![[Horse]] |
![[Horse]] |
||
! style="padding: 8px" | |
! style="padding: 8px" | |
||
| Line 216: | Line 210: | ||
! style="padding: 8px" | |
! style="padding: 8px" | |
||
|- |
|- |
||
| − | |[[File: |
+ | |[[File:Plant_sugarcane_3_crop.png|link=https://ymir.gamepedia.com/File:Plant_sugarcane_3_crop.png|center|frameless|64x64px]] |
![[Camel]] |
![[Camel]] |
||
! style="padding: 8px" | |
! style="padding: 8px" | |
||
| Line 227: | Line 221: | ||
! style="padding: 8px" | |
! style="padding: 8px" | |
||
|- |
|- |
||
| − | |[[File: |
+ | |[[File:Plant_sugarcane_3_crop.png|link=https://ymir.gamepedia.com/File:Plant_sugarcane_3_crop.png|center|frameless|64x64px]] |
![[Elephant]] |
![[Elephant]] |
||
! |
! |
||
Revision as of 02:14, 28 May 2019
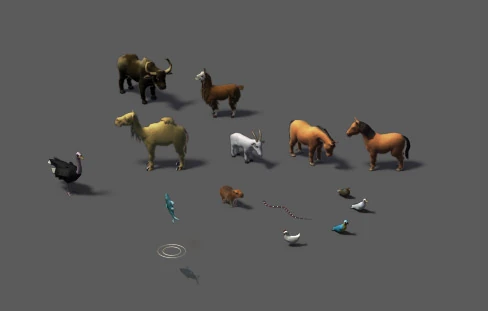
Animals in Ymir are a source of meat and leather and can be found in four forms:
- As a Resource that can be gathered by a hunter.
- As a herd roaming on the world map, which the player can either hunt or capture.
- As a hostile Unit during a random event while exploring the world map.
- As an inventory item obtained through capture or breeding.
While a hunter or attacking a herd provides meat and leather directly, animals in inventory form must be processed by a butcher.
note: disbanding an army unit animal will turn it into its inventory form and the player will not be able to recruit it anymore.
Breedable animals
New animals are bred over time in the cattle farm's annex, the pasture.
A paddock with empty room and a worker is required to store new animals.
Each pasture will require two animals of the same type to be built.
Woolly animals
Woolly animals also produce wool along with meat and leather and can be used to build a wool pasture, an annex of the cattle farm, dedicated to producing wool only.
Animals
Ranchable Animals
| Animals\Climates | Nordic | Oceanic | Continental | Tropical | Mediterranean | Arid | Desert |
|---|---|---|---|---|---|---|---|
| Buffalo | X | X | |||||
| Camel | X | X | |||||
| Capybaras | X | ||||||
| Chicken | X | X | X | X | X | ||
| Cow | X | X | X | X | |||
| Deer | X | X | X | X | |||
| Goat | X | X | |||||
| Horse | X | X | X | X | |||
| Llama | X | X | |||||
| Ostrich | X | X | |||||
| Rabbit | X | X | |||||
| Sheep | X | X |
All of the above animals can appear as a exploitable tile resource, used by the Hunter.
Captured animals can be used for building pasture at the Cattle Farm.
| Appearance | Animal Name | Primary
Industry |
Cold | Temperate | Hot | |||||
|---|---|---|---|---|---|---|---|---|---|---|
| Polar | Nordic | Oceanic | Continental | Mediterranean | Arid | Desert | Tropical | |||
 |
Rabbit | Meat Source |  |
|
||||||
|
Chicken | |
|
|
|
| ||||
|
Ostrich | |
|
|||||||
|
Deer | Leather Source
+ Meat Source |
|
|
|
|
||||
|
Cow | |
|
|
|
|||||
|
Goat | |
|
|||||||
|
Buffalo | |
| |||||||
|
Capybara | | ||||||||
|
Sheep | Textiles | |
|
||||||
|
Llama | |
* | * | * | | ||||
|
Mammoth | Mounted
Units |
Wild Only | |||||||
|
Horse | |
|
|
|
|||||
|
Camel | |
|
|||||||
|
Elephant | Wild Only | Wild Only | Wild Only | ||||||
* Mediterranean, Arid, and Desert climates rely on Flax from Gathering Camps for Textile production. Continental climates can also grow Cotton as a more efficient alre
Cattle farm animals production rate
Cattle farm are used to keep and breed animals in order to either produce more animals or wool. How many animals or how much wool is produced varies between the different animals, but is also dependent on the fertility value of the land the pasture is on.
The following tables show the production rates of a cattle farm with 10 pastures with 3 fertility (0.75 efficiency in each of the pastures).
Animal production:
| Animals/ Production rate | Animals |
|---|---|
| Buffalo | 0.5 |
| Camel | |
| Capybaras | |
| Chicken | |
| Cow | 0.5 |
| Deer | 0.5 |
| Goat | |
| Horse | 0.5 |
| Llama | 0.5 |
| Ostrich | |
| Rabbit | |
| Sheep |
Production for wool only pastures:
| Animals/ Production rate | Wool |
|---|---|
| Llama | 5.0 |
| Sheep |
Butcher rates of ranchable animals
Animals produced by the cattle farm can be processed in the butcher's shop to produce meat and potentially leather and/or wool, depending on the species. The quantity of leather and wool generated differs between different species, however all animals produce the same amount of meat. The breeding rate (See. Previous table) instead differentiates effective meat production.
The following table shows practical production rates of each building. Values shown are practical and after being rounded.
| Animal | Meat | Leather | Wool |
|---|---|---|---|
| Buffalo | 12 | 5 | 0 |
| Camel | 12 | 2 | 0 |
| Capybara | 12 | 0 | |
| Chicken | 12 | 0 | |
| Cow | 12 | 0 | |
| Deer | 12 | 0 | |
| Goat | 12 | 2 | 0 |
| Horse | 12 | 0 | |
| Llama | 12 | ||
| Ostrich | 12 | 0 | 0 |
| Rabbit | 12 | 0 | |
| Sheep | 12 |
| Animal | Meat | Leather | Wool | Animals Cost |
|---|---|---|---|---|
| Buffalo | 1.2 | 0.5 | 0 | 0.1 |
| Camel | 1.2 | 0.2 | 0 | 0.1 |
| Capybara | 1.2 | 0 | 0.1 | |
| Chicken | 1.2 | 0 | 0.1 | |
| Cow | 1.2 | 0 | 0.1 | |
| Deer | 1.2 | 0 | 0.1 | |
| Goat | 1.2 | 0.2 | 0 | 0.1 |
| Horse | 1.2 | 0 | 0.1 | |
| Llama | 1.2 | 0.1 | ||
| Ostrich | 1.2 | 0 | 0 | 0.1 |
| Rabbit | 1.2 | 0 | 0.1 | |
| Sheep | 1.2 | 0.1 |
The following table shows base production rates of each animal with the Butcher consuming 0.5 animals per production cycle. Values shown are before being rounded. Rounding gives deviations depending on Building Efficiency and Worker count.
| Animals/ Produced items | Meat | Leather | Wool |
|---|---|---|---|
| Buffalo | 4 | 1.8 | 0 |
| Camel | 4 | 0.66 | 0 |
| Capybaras | |||
| Chicken | 4 | 0 | 0 |
| Cow | 4 | 1.33 | 0 |
| Deer | 4 | 1 | 0 |
| Goat | 4 | 0.66 | 0 |
| Horse | 4 | 0.5 | 0 |
| Llama | 4 | 0.8 | 0.5 |
| Ostrich | 4 | 0 | 0 |
| Rabbit | 4 | 0 | 0 |
| Sheep | 4 | 0.66 | 0.66 |
Other Animals
Other animals may appear in the game and although all but fish can be captured, none of them can be produced through animal breeding. Instead of using them for meat and leather (although possible) their primary use is as a strategic resources that provide elite troops.
| Animals\Climates | Nordic | Oceanic | Continental | Tropical | Mediterranean | Arid | Desert |
|---|---|---|---|---|---|---|---|
| Bear | X | X | X | X | X | X | X |
| Elephant | X | X | X | ||||
| Fish* | X | X | X | X | X | X | X |
| Mammoth | X | ||||||
| Wolves | X | X | X | X | X | X | X |
* appears only as a exploitable tile resource, which is exploited by the Fisherpig.