Tag: Visual edit |
No edit summary Tag: Visual edit |
||
| (41 intermediate revisions by 13 users not shown) | |||
| Line 1: | Line 1: | ||
[[File:Animals.jpg|right|350px|Animals]] |
[[File:Animals.jpg|right|350px|Animals]] |
||
| − | '''Animals''' in ''[[Ymir]]'' are a source of [[ |
+ | '''Animals''' in ''[[Ymir]]'' are a source of [[Meat]] and [[Leather]] and can be collected in the following methods: |
#As a [[Resources|Resource]] that can be gathered by a[[Hunter | hunter]]. |
#As a [[Resources|Resource]] that can be gathered by a[[Hunter | hunter]]. |
||
#As a [[herd]] roaming on the world map, which the player can either hunt or capture. |
#As a [[herd]] roaming on the world map, which the player can either hunt or capture. |
||
#As a hostile [[Units|Unit]] during a random event while exploring the [[world map]]. |
#As a hostile [[Units|Unit]] during a random event while exploring the [[world map]]. |
||
#As an [[inventory]] item obtained through capture or breeding. |
#As an [[inventory]] item obtained through capture or breeding. |
||
| + | #As a [[Prospecting|Prospect-able]] [[Resource]], which can then be [[Scavenging|Scavenged]] from the territory. |
||
While a [[hunter]] or attacking a herd provides [[meat]] and [[leather]] directly, animals in inventory form must be processed by a [[butcher]]. |
While a [[hunter]] or attacking a herd provides [[meat]] and [[leather]] directly, animals in inventory form must be processed by a [[butcher]]. |
||
| + | == Animals == |
||
| − | ''note: disbanding an army unit animal will turn it into its inventory form and the player will not be able to recruit it anymore.'' |
||
| + | {| class="wikitable" style="text-align: center;" |
||
| − | == Breedable animals == |
||
| + | ! rowspan="2" |Portrait |
||
| − | New animals are bred over time in the [[Cattle Farm|cattle farm's]] annex, the pasture. |
||
| + | ! style="padding: 8px" rowspan="2" |Animal Name |
||
| + | ! style="padding: 8px" rowspan="2" |Primary |
||
| + | Industry |
||
| + | ! style="padding: 8px" colspan="2" |<span style="color:DeepSkyBlue">Cold</span> |
||
| + | ! style="padding: 8px" colspan="3" |<span style="color:LimeGreen">Temperate</span> |
||
| + | ! style="padding: 8px" colspan="3" |<span style="color:Coral">Hot</span> |
||
| + | |- |
||
| + | ! style="padding: 8px"|[[Polar]] |
||
| + | ! style="padding: 8px"|[[Nordic]] |
||
| + | ! style="padding: 8px"|[[Oceanic]] |
||
| + | ! style="padding: 8px"|[[Continental]] |
||
| + | ! style="padding: 8px"|[[Mediterranean]] |
||
| + | ! style="padding: 8px"|[[Arid]] |
||
| + | ! style="padding: 8px"|[[Desert]] |
||
| + | ! style="padding: 8px"|[[Tropical]] |
||
| + | |- |
||
| + | |[[File:Unit rabbit big.png|center|frameless|65x65px]] |
||
| + | ![[Rabbit]] |
||
| + | ! rowspan="3" style="padding: 8px" |Meat Only |
||
| + | <small>(+50% Growth)</small> |
||
| − | A [[paddock]] with empty room and a worker is required to store new animals. |
||
| + | <br /> |
||
| − | Each pasture will require two animals of the same type to be built. |
||
| + | ! |
||
| − | |||
| + | ! style="padding: 8px" |[[File:Green check.svg|center|32px|frameless]] |
||
| − | == Woolly animals == |
||
| + | ! style="padding: 8px" |[[File:Green check.svg|center|32px|frameless]] |
||
| − | Woolly animals also produce [[wool]] along with [[meat]] and [[leather]] and can be used to build a wool pasture, an annex of the [[cattle farm]], dedicated to producing [[wool]] only. |
||
| + | ! |
||
| − | |||
| + | ! |
||
| − | == Animals == |
||
| + | ! |
||
| − | ===Ranchable Animals=== |
||
| + | ! |
||
| − | {| class="wikitable" style="text-align: center;" |
||
| + | ! |
||
| − | !Animals\Climates|| [[Nordic]] || [[Oceanic]] || [[Continental]] || [[Tropical]] || [[Mediterranean]] || [[Arid]] || [[Desert]] |
||
|- |
|- |
||
| + | |[[File:Unit chicken big.png|center|frameless|65x65px]] |
||
| − | |[[Buffalo]]|| || || ||X|| ||X|| |
||
| + | ![[Chicken]] |
||
| + | ! style="padding: 8px" | |
||
| + | ! style="padding: 8px" | |
||
| + | ! style="padding: 8px" |[[File:Green check.svg|center|32px|frameless]] |
||
| + | ! style="padding: 8px" |[[File:Green check.svg|center|32px|frameless]] |
||
| + | ! style="padding: 8px" |[[File:Green check.svg|center|32px|frameless]] |
||
| + | ! style="padding: 8px" |[[File:Green check.svg|center|32px|frameless]] |
||
| + | ! style="padding: 8px" |[[File:Green check.svg|center|32px|frameless]] |
||
| + | ! style="padding: 8px" |[[File:Green check.svg|center|32px|frameless]] |
||
|- |
|- |
||
| + | |[[File:Unit ostrich big.png|center|frameless|65x65px]] |
||
| − | |[[Camel]]|| || || || || ||X||X |
||
| + | ![[Ostrich]] |
||
| + | ! style="padding: 8px" | |
||
| + | ! style="padding: 8px" | |
||
| + | ! style="padding: 8px" | |
||
| + | ! style="padding: 8px" | |
||
| + | ! style="padding: 8px" | |
||
| + | ! style="padding: 8px" |[[File:Green check.svg|center|32px|frameless]] |
||
| + | ! style="padding: 8px" |[[File:Green check.svg|center|32px|frameless]] |
||
| + | ! style="padding: 8px" | |
||
|- |
|- |
||
| + | |[[File:Unit cow big.png|center|frameless|65x65px]] |
||
| − | |[[Capybaras]]|| || || ||X|| || || |
||
| + | ![[Cow]] |
||
| + | ! rowspan="5" style="padding: 8px" |Leather |
||
| + | |||
| + | with Meat |
||
| + | ! |
||
| + | ! style="padding: 8px" |[[File:Green check.svg|center|32px|frameless]] |
||
| + | ! style="padding: 8px" |[[File:Green check.svg|center|32px|frameless]] |
||
| + | ! style="padding: 8px" |[[File:Green check.svg|center|32px|frameless]] |
||
| + | ! style="padding: 8px" |[[File:Green check.svg|center|32px|frameless]] |
||
| + | ! |
||
| + | ! |
||
| + | ! |
||
|- |
|- |
||
| + | |[[File:Unit deer big.png|center|frameless|65x65px]] |
||
| − | |[[Chicken]]||||X||X||X||X||X|| |
||
| + | ![[Deer]] ** |
||
| + | ! |
||
| + | ! style="padding: 8px" |Wild Only |
||
| + | ! style="padding: 8px" |Wild Only |
||
| + | ! style="padding: 8px" |Wild Only |
||
| + | ! style="padding: 8px" |Wild Only |
||
| + | ! |
||
| + | ! |
||
| + | ! |
||
|- |
|- |
||
| + | |[[File:Unit goat big.png|center|frameless|65x65px]] |
||
| − | |[[Cow]]||X||X||X|| ||X|| || |
||
| + | ![[Goat]] |
||
| + | ! style="padding: 8px" | |
||
| + | ! style="padding: 8px" | |
||
| + | ! style="padding: 8px" | |
||
| + | ! style="padding: 8px" | |
||
| + | ! style="padding: 8px" |[[File:Green check.svg|center|32px|frameless]] |
||
| + | ! style="padding: 8px" |[[File:Green check.svg|center|32px|frameless]] |
||
| + | ! style="padding: 8px" | |
||
| + | ! style="padding: 8px" | |
||
|- |
|- |
||
| + | |[[File:Unit buffalo big.png|center|frameless|65x65px]] |
||
| − | |[[Deer]]|| X|| X ||X|| ||X|| || |
||
| + | ![[Buffalo]] |
||
| + | ! style="padding: 8px" |[[File:Green check.svg|center|32px|frameless]] |
||
| + | ! style="padding: 8px" | |
||
| + | ! style="padding: 8px" | |
||
| + | ! style="padding: 8px" | |
||
| + | ! style="padding: 8px" | |
||
| + | ! style="padding: 8px" |[[File:Green check.svg|center|32px|frameless]] |
||
| + | ! style="padding: 8px" |[[File:Green check.svg|center|32px|frameless]] |
||
| + | ! style="padding: 8px" |[[File:Green check.svg|center|32px|frameless]] |
||
|- |
|- |
||
| + | |[[File:Unit capybara big.png|center|frameless|65x65px]] |
||
| − | |[[Goat]]|| || || || ||X||X|| |
||
| + | ![[Capybaras|Capybara]] ** |
||
| + | ! style="padding: 8px" | |
||
| + | ! style="padding: 8px" | |
||
| + | ! style="padding: 8px" | |
||
| + | ! style="padding: 8px" | |
||
| + | ! style="padding: 8px" | |
||
| + | ! style="padding: 8px" | |
||
| + | ! style="padding: 8px" | |
||
| + | ! style="padding: 8px" | |
||
|- |
|- |
||
| + | |[[File:Unit sheep big.png|center|frameless|65x65px]] |
||
| − | |[[Horse]]||X||X|| X || ||X|| || |
||
| + | ![[Sheep]] |
||
| + | ! rowspan="2" |Textiles * |
||
| + | ! |
||
| + | ! style="padding: 8px" |[[File:Green check.svg|center|32px|frameless]] |
||
| + | ! style="padding: 8px" |[[File:Green check.svg|center|32px|frameless]] |
||
| + | !Wild Only |
||
| + | ! |
||
| + | ! |
||
| + | ! |
||
| + | ! |
||
|- |
|- |
||
| + | |[[File:Unit llama big.png|center|frameless|65x65px]] |
||
| − | |[[Llama]]|| || ||X||X|| || || |
||
| + | ![[Llama]] |
||
| + | ! |
||
| + | ! |
||
| + | ! |
||
| + | ! style="padding: 8px" |[[File:Green check.svg|center|32px|frameless]] |
||
| + | ! |
||
| + | ! |
||
| + | ! |
||
| + | ! style="padding: 8px" |[[File:Green check.svg|center|32px|frameless]] |
||
|- |
|- |
||
| + | |[[File:Unit mammoth big.png|center|frameless|65x65px]] |
||
| − | |[[Ostrich]]|| || || || || ||X||X |
||
| + | ![[Mammoth]] ** |
||
| + | ! rowspan="4" |Military |
||
| + | |||
| + | <small>(-25% Growth)</small> |
||
| + | ! |
||
| + | ! style="padding: 8px" |Wild Only |
||
| + | ! |
||
| + | ! |
||
| + | ! |
||
| + | ! |
||
| + | ! |
||
| + | ! |
||
|- |
|- |
||
| + | |[[File:Unit horse big.png|center|frameless|65x65px]] |
||
| − | |[[Rabbit]]||X||X|| || || || || |
||
| + | ![[Horse]] |
||
| + | ! style="padding: 8px" | |
||
| + | ! style="padding: 8px" |[[File:Green check.svg|center|32px|frameless]] |
||
| + | ! style="padding: 8px" |[[File:Green check.svg|center|32px|frameless]] |
||
| + | ! style="padding: 8px" |[[File:Green check.svg|center|32px|frameless]] |
||
| + | ! style="padding: 8px" |[[File:Green check.svg|center|32px|frameless]] |
||
| + | ! style="padding: 8px" | |
||
| + | ! style="padding: 8px" | |
||
| + | ! style="padding: 8px" | |
||
|- |
|- |
||
| + | |[[File:Unit camel big.png|center|frameless|65x65px]] |
||
| − | |[[Sheep]]||X||X|| || || || || |
||
| + | ![[Camel]] |
||
| + | ! style="padding: 8px" | |
||
| + | ! style="padding: 8px" | |
||
| + | ! style="padding: 8px" | |
||
| + | ! style="padding: 8px" | |
||
| + | ! style="padding: 8px" | |
||
| + | ! style="padding: 8px" |[[File:Green check.svg|center|32px|frameless]] |
||
| + | ! style="padding: 8px" |[[File:Green check.svg|center|32px|frameless]] |
||
| + | ! style="padding: 8px" | |
||
| + | |- |
||
| + | |[[File:Unit elephant big.png|center|frameless|65x65px]] |
||
| + | ![[Elephant]] ** |
||
| + | ! |
||
| + | ! |
||
| + | ! |
||
| + | ! |
||
| + | ! |
||
| + | ! style="padding: 8px" |Wild Only |
||
| + | ! style="padding: 8px" |Wild Only |
||
| + | ! style="padding: 8px" |Wild Only |
||
|} |
|} |
||
| + | '''''* Mediterranean, Arid, and Desert climates rely on [[Flax]] from [[Gathering camp|Gathering Camps]] for Textile production. [[Cotton]] can also be grown in Continental climates as a more-efficient alternative to Llamas.''''' |
||
| − | All of the above animals can appear as a exploitable tile resource, used by the [[Hunter]]. <br> |
||
| + | |||
| − | Captured animals can be used for building pasture at the [[Cattle Farm]]. |
||
| + | '''''** Not able to breed.''''' |
||
| + | == Ranch Production (Overview) == |
||
| − | ===Cattle farm animals production rate=== |
||
| + | Eventually, finding animals to continue hunting on the worldmap becomes difficult as their numbers are depleted. Once settlements have unlocked the appropriate [[Knowledges]], their Armies can begin capturing herds to raise as livestock on [[Cattle Farm|Animal Farms]]. After they become fully grown, you can send the animals to a [[Butcher]] to be converted into food and other materials. |
||
| − | [[Cattle farm]] are used to keep and breed animals in order to either produce more animals or [[wool]]. How many animals or how much wool is produced varies between the different animals, but is also dependent on the [[fertility]] value of the land the pasture is on. |
||
| + | '''For a detailed breakdown of each step, see respective the [[Cattle Farm|Animal Farm]] and [[Butcher]] pages.''' |
||
| − | The following tables show the production rates of a [[cattle farm]] with 10 pastures with 3 [[fertility]] (0.75 efficiency in each of them). |
||
| + | Since ranch production scales with Fertility, but not Workforce, we can "measure" the overall efficiency of ranching for each animal species based on the amount of Fertility you need to produce the same materials. The following table provides a brief summary of those values: |
||
| − | Animal production: |
||
| + | |||
| − | {| class="wikitable" style="text-align: center;" |
||
| + | === Pastures === |
||
| − | !Animals/ Production rate|| [[Animals]] |
||
| + | {| class="wikitable" |
||
| + | ! rowspan="2" |Pasture |
||
| + | ! colspan="3" |<u>Fertility Cost to Produce</u>** |
||
| + | <code># Annexes * Avg. Fertility</code> |
||
| + | !<u>Trade Routes</u> |
||
| + | (Cargo Volume) |
||
|- |
|- |
||
| − | + | !1 [[Meat]] |
|
| + | !1 [[Leather]] |
||
| + | !1 [[Textiles]] |
||
| + | !1 [[Meat]] |
||
|- |
|- |
||
| + | !Hunter |
||
| − | |[[Camel]]|| |
||
| + | !- |
||
| + | !- |
||
| + | !- |
||
| + | !0.2 |
||
|- |
|- |
||
| − | + | ![[Rabbit]] |
|
| + | !4.8 |
||
| + | ! |
||
| + | ! |
||
| + | !0.05 |
||
|- |
|- |
||
| − | + | ![[Chicken]] |
|
| + | !4.8 |
||
| + | ! |
||
| + | ! |
||
| + | !0.05 |
||
|- |
|- |
||
| − | + | ![[Ostrich]] |
|
| + | !5.3 |
||
| + | ! |
||
| + | ! |
||
| + | !0.1 |
||
|- |
|- |
||
| − | + | ![[Cow]] |
|
| + | !7.1 |
||
| + | !18 |
||
| + | ! |
||
| + | !0.1 |
||
|- |
|- |
||
| − | + | ![[Deer]] |
|
| + | !6.5 |
||
| + | !26 |
||
| + | ! |
||
| + | !0.1 |
||
|- |
|- |
||
| − | + | ![[Goat]] |
|
| + | !5.0 |
||
| + | !25 |
||
| + | ! |
||
| + | !0.1 |
||
|- |
|- |
||
| − | + | ![[Buffalo]] |
|
| + | !7.1 |
||
| + | !14 |
||
| + | ! |
||
| + | !0.1 |
||
|- |
|- |
||
| + | ![[Capybaras|Capybara]] |
||
| − | |[[Ostrich]]|| |
||
| + | !? |
||
| + | !? |
||
| + | ! |
||
| + | !0.1 |
||
|- |
|- |
||
| − | + | ![[Sheep]] |
|
| + | !6.5 |
||
| + | !33 |
||
| + | !66 |
||
| + | !0.1 |
||
|- |
|- |
||
| − | + | ![[Llama]] |
|
| + | !6.7 |
||
| − | |} |
||
| + | !27 |
||
| − | |||
| + | !90 |
||
| − | Production for [[wool]] only pastures: |
||
| + | !0.1 |
||
| − | {| class="wikitable" style="text-align: center;" |
||
| − | !Animals/ Production rate|| [[Wool]] |
||
|- |
|- |
||
| − | + | ![[Horse]] |
|
| + | !8.0 |
||
| + | !53 |
||
| + | ! |
||
| + | !0.1 |
||
|- |
|- |
||
| − | + | ![[Camel]] |
|
| + | !8.0 |
||
| + | !40 |
||
| + | ! |
||
| + | !0.1 |
||
|} |
|} |
||
| + | === Wool Paddock === |
||
| − | ===Butcher rates of ranchable animals=== |
||
| + | {| class="wikitable" |
||
| − | Animals produced by the [[cattle farm]] can be processed in the [[butcher]]'s shop to produce [[meat]] and potentially [[leather]] and/or [[wool]], depending on the species. The quantity of leather and wool generated differs between different species, however all animals produce the same amount of meat. The breeding rate (See. Previous table) instead differentiates effective meat production. |
||
| + | ! rowspan="2" |Wool |
||
| − | |||
| + | Paddock |
||
| − | The following table shows the production rates of each animal with the Butcher having 6 workforce (3 efficiency) consuming 0.5 animals (100% efficiency) per production cycle. |
||
| + | ! colspan="3" |<u>Fertility Cost to Produce</u>** |
||
| − | {| class="wikitable" style="text-align: center;" |
||
| + | <code># Annexes * Avg. Fertility</code> |
||
| − | !Animals/ Produced items|| [[Meat]] || [[Leather]] || [[Wool]] |
||
| + | !<u>Trade Routes</u> |
||
| + | (Cargo Volume) |
||
|- |
|- |
||
| + | !1 [[Meat]] |
||
| − | |[[Buffalo]]|| 4 || 1.8 || 0 |
||
| + | !1 [[Leather]] |
||
| + | !1 [[Textiles]] |
||
| + | !1 [[Textiles]] |
||
|- |
|- |
||
| + | !Cotton |
||
| − | |[[Camel]]|| 4 || 0.66 || 0 |
||
| + | ! |
||
| + | ! |
||
| + | !8* |
||
| + | !0.2 |
||
|- |
|- |
||
| + | !Flax |
||
| − | |[[Capybaras]]|| || || |
||
| + | ! |
||
| + | ! |
||
| + | !8* |
||
| + | !0.2 |
||
|- |
|- |
||
| + | ![[Sheep]] |
||
| − | |[[Chicken]]|| || || |
||
| + | ! |
||
| + | ! |
||
| + | !12 |
||
| + | !0.2 |
||
|- |
|- |
||
| + | ![[Llama]] |
||
| − | |[[Cow]]|| 4 || 1.33 || 0 |
||
| + | ! |
||
| − | |- |
||
| + | ! |
||
| − | |[[Deer]]|| 4 || 1 || 0 |
||
| + | !12 |
||
| − | |- |
||
| + | !''0.2'' |
||
| − | |[[Goat]]|| 4 || 0.66 || 0 |
||
| − | |- |
||
| − | |[[Horse]]|| 4 || 0.5 || 0 |
||
| − | |- |
||
| − | |[[Llama]]|| 4 || 0.8 || 0.5 |
||
| − | |- |
||
| − | |[[Ostrich]]|| 4 || 0 || 0 |
||
| − | |- |
||
| − | |[[Rabbit]]|| 4 || 0 || 0 |
||
| − | |- |
||
| − | |[[Sheep]]|| 4 || 0.66 || 0.66 |
||
|} |
|} |
||
| + | ''* Cotton and Flax have been scaled to match the same area coverage as a Wool Paddock (from 4x4 to 16x16) for this comparison'' |
||
| − | ===Other Animals=== |
||
| + | |||
| − | Other animals may appear in the game and although all but fish can be captured, none of them can be produced through animal breeding. Instead of using them for meat and leather (although possible) their primary use is as a strategic resources that provide elite troops. |
||
| + | ''** Doesn't include the rounding effects for the first 0.1 units of production, so players first unlocking ranching will see much lower costs (temporarily) due to the strong rounding effects for Level 1 buildings.'' |
||
| − | {| class="wikitable" style="text-align: center;" |
||
| + | |||
| − | !Animals\Climates|| [[Nordic]] || [[Oceanic]] || [[Continental]] || [[Tropical]] || [[Mediterranean]] || [[Arid]] || [[Desert]] |
||
| + | == Hostile Animals == |
||
| − | |- |
||
| + | Not all animals in Ymir get along well with porcos. There are a few additional species which can be found anywhere on the worldmap, but are treated as Barbarians that will immediately attack any units that step on their territory. |
||
| − | |[[Bear]]||X||X||X||X||X||X||X |
||
| + | {| class="wikitable" |
||
| + | ! rowspan="2" |Portrait |
||
| + | ! rowspan="2" |Animal Name |
||
| + | ! rowspan="2" |Primary |
||
| + | Industry |
||
| + | ! style="padding: 8px" colspan="2" |<span style="color:DeepSkyBlue">Cold</span> |
||
| + | ! style="padding: 8px" colspan="3" |<span style="color:LimeGreen">Temperate</span> |
||
| + | ! style="padding: 8px" colspan="3" |<span style="color:Coral">Hot</span> |
||
|- |
|- |
||
| + | ![[Polar]] |
||
| − | |[[Elephant]]|| || || || X || || X||X |
||
| + | ![[Nordic]] |
||
| + | ![[Oceanic]] |
||
| + | ![[Continental]] |
||
| + | ![[Mediterranean]] |
||
| + | ![[Arid]] |
||
| + | ![[Desert]] |
||
| + | ![[Tropical]] |
||
|- |
|- |
||
| + | |[[File:Unit_wolf_big.png|link=https://ymir.gamepedia.com/File:Unit_wolf_big.png|center|frameless|65x65px]] |
||
| − | |[[Fish]]*||X||X||X||X||X||X||X |
||
| + | ![[Wolf]] |
||
| + | ! rowspan="2" |Military |
||
| + | <small>(if captured)</small> |
||
| + | ! style="padding: 8px" colspan="8" |Wild Only |
||
|- |
|- |
||
| + | |[[File:Unit_bear_big.png|link=https://ymir.gamepedia.com/File:Unit_bear_big.png|center|frameless|65x65px]] |
||
| − | |[[Mammoth]]|| X || || || || || || |
||
| + | ![[Bear]] |
||
| + | ! style="padding: 8px" colspan="8" |Wild Only |
||
|- |
|- |
||
| + | |[[File:Unit_porkoderthal_big.png|link=https://ymir.gamepedia.com/File:Unit_porkoderthal_big.png|center|frameless|65x65px]] |
||
| − | |[[Wolf|Wolves]]||X||X||X||X||X||X||X |
||
| + | ![[Porkoderthal]] |
||
| + | !Cannot |
||
| + | Capture |
||
| + | ! style="padding: 8px" colspan="8" |Wild Only |
||
|} |
|} |
||
| + | [[Category:Animals]] |
||
| − | <nowiki>*</nowiki> appears only as a exploitable tile resource, which is exploited by the [[Fisherpig]]. |
||
| − | + | [[Category:Resources]] |
|
| − | [[Category:Animals| ]] |
||
Revision as of 07:45, 4 August 2021
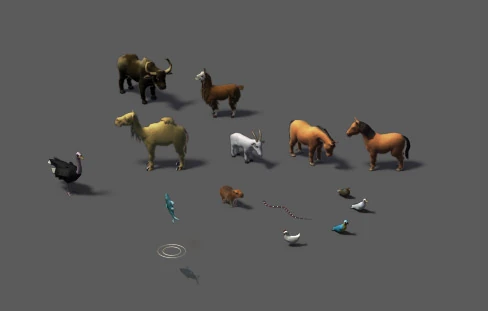
Animals in Ymir are a source of Meat and Leather and can be collected in the following methods:
- As a Resource that can be gathered by a hunter.
- As a herd roaming on the world map, which the player can either hunt or capture.
- As a hostile Unit during a random event while exploring the world map.
- As an inventory item obtained through capture or breeding.
- As a Prospect-able Resource, which can then be Scavenged from the territory.
While a hunter or attacking a herd provides meat and leather directly, animals in inventory form must be processed by a butcher.
Animals
| Portrait | Animal Name | Primary
Industry |
Cold | Temperate | Hot | |||||
|---|---|---|---|---|---|---|---|---|---|---|
| Polar | Nordic | Oceanic | Continental | Mediterranean | Arid | Desert | Tropical | |||
| Rabbit | Meat Only
(+50% Growth)
|
|||||||||
| Chicken | ||||||||||
| Ostrich | ||||||||||
| Cow | Leather
with Meat |
|||||||||
| Deer ** | Wild Only | Wild Only | Wild Only | Wild Only | ||||||
| Goat | ||||||||||
| Buffalo | ||||||||||
| Capybara ** | ||||||||||
| Sheep | Textiles * | Wild Only | ||||||||
| Llama | ||||||||||
| Mammoth ** | Military
(-25% Growth) |
Wild Only | ||||||||
| Horse | ||||||||||
| Camel | ||||||||||
| Elephant ** | Wild Only | Wild Only | Wild Only | |||||||
* Mediterranean, Arid, and Desert climates rely on Flax from Gathering Camps for Textile production. Cotton can also be grown in Continental climates as a more-efficient alternative to Llamas.
** Not able to breed.
Ranch Production (Overview)
Eventually, finding animals to continue hunting on the worldmap becomes difficult as their numbers are depleted. Once settlements have unlocked the appropriate Knowledges, their Armies can begin capturing herds to raise as livestock on Animal Farms. After they become fully grown, you can send the animals to a Butcher to be converted into food and other materials.
For a detailed breakdown of each step, see respective the Animal Farm and Butcher pages.
Since ranch production scales with Fertility, but not Workforce, we can "measure" the overall efficiency of ranching for each animal species based on the amount of Fertility you need to produce the same materials. The following table provides a brief summary of those values:
Pastures
| Pasture | Fertility Cost to Produce**
|
Trade Routes
(Cargo Volume) | ||
|---|---|---|---|---|
| 1 Meat | 1 Leather | 1 Textiles | 1 Meat | |
| Hunter | - | - | - | 0.2 |
| Rabbit | 4.8 | 0.05 | ||
| Chicken | 4.8 | 0.05 | ||
| Ostrich | 5.3 | 0.1 | ||
| Cow | 7.1 | 18 | 0.1 | |
| Deer | 6.5 | 26 | 0.1 | |
| Goat | 5.0 | 25 | 0.1 | |
| Buffalo | 7.1 | 14 | 0.1 | |
| Capybara | ? | ? | 0.1 | |
| Sheep | 6.5 | 33 | 66 | 0.1 |
| Llama | 6.7 | 27 | 90 | 0.1 |
| Horse | 8.0 | 53 | 0.1 | |
| Camel | 8.0 | 40 | 0.1 | |
Wool Paddock
| Wool
Paddock |
Fertility Cost to Produce**
|
Trade Routes
(Cargo Volume) | ||
|---|---|---|---|---|
| 1 Meat | 1 Leather | 1 Textiles | 1 Textiles | |
| Cotton | 8* | 0.2 | ||
| Flax | 8* | 0.2 | ||
| Sheep | 12 | 0.2 | ||
| Llama | 12 | 0.2 | ||
* Cotton and Flax have been scaled to match the same area coverage as a Wool Paddock (from 4x4 to 16x16) for this comparison
** Doesn't include the rounding effects for the first 0.1 units of production, so players first unlocking ranching will see much lower costs (temporarily) due to the strong rounding effects for Level 1 buildings.
Hostile Animals
Not all animals in Ymir get along well with porcos. There are a few additional species which can be found anywhere on the worldmap, but are treated as Barbarians that will immediately attack any units that step on their territory.
| Portrait | Animal Name | Primary
Industry |
Cold | Temperate | Hot | |||||
|---|---|---|---|---|---|---|---|---|---|---|
| Polar | Nordic | Oceanic | Continental | Mediterranean | Arid | Desert | Tropical | |||
| Wolf | Military
(if captured) |
Wild Only | ||||||||
| Bear | Wild Only | |||||||||
| Porkoderthal | Cannot
Capture |
Wild Only | ||||||||